This downlight beam angle guide explains how narrow, medium, and wide beams affect light distribution, spacing, glare, and visual comfort in real spaces.
In practice, this guide shows when to use narrow, medium, and wide beams with clear examples. It is written for homeowners, architects, and contractors who want downlights that look clean on site, not just on paper.
How Beam Angle Changes What You See
A downlight does not “fill a room” by default. It creates a cone of light. The beam angle controls how tight or how wide that cone is. The same lumen package can look punchy, flat, or uncomfortable depending on the optics.
For a clear technical definition, see the IES definition of beam angle.
As a practical starting point for interior downlights:
- Narrow beam (10°–20°): strong accent on art, textures, and focal points.
- Medium beam (24°–36°): balanced for general lighting and task areas.
- Wide beam (40°–60°): soft coverage, fewer “hot spots,” useful for low ceilings.
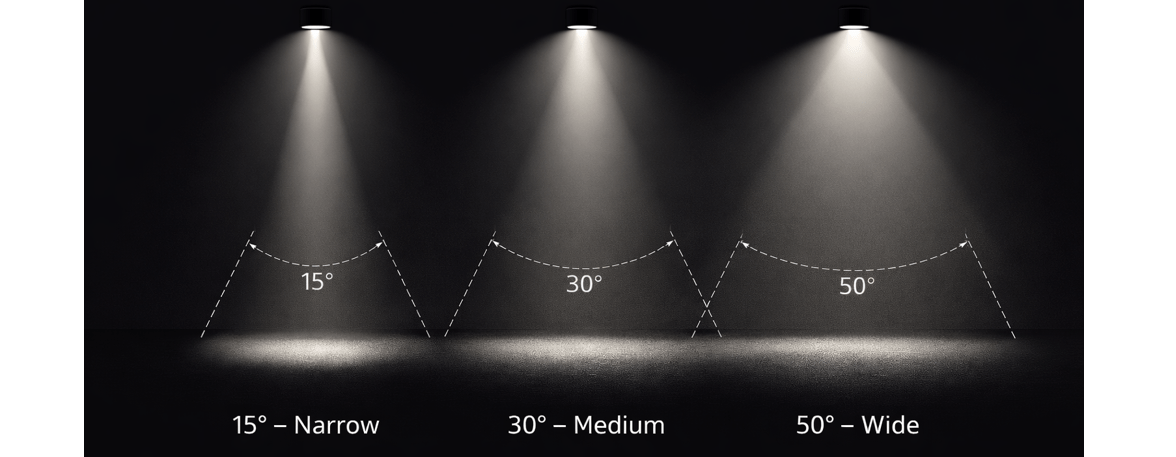
Visual comparison: narrow, medium, and wide downlight beam spreads at the same ceiling height.
What “narrow vs wide” really means in a room
Beam angle is not a style choice. It is a performance choice. It controls contrast, spacing, and visual comfort. As a result, you can use it to guide the eye, reduce fixture count, or avoid uneven bright spots.
- Narrow beams create drama, but can cause strong hot spots if overused.
- Medium beams are the default for most clean residential and commercial layouts.
- Wide beams soften the space, but can reduce vertical punch on walls and displays.
However, one key point remains: beam angle on a spec sheet is only part of the story. Real results depend on ceiling height, trim type, shielding, and the exact IES file for the fixture.
Practical Rules for Choosing Beam Angles
Use beam angle with three checks: ceiling height, spacing and the task. This keeps the layout simple and avoids the most common mistakes.
- Ceiling height: higher ceilings usually need tighter beams or higher output to avoid a dim floor.
- Spacing: spacing changes when beam angle changes. Wide beams can be spaced farther, narrow beams usually cannot.
- Task and surfaces: counters, vanities, art, and textured walls each benefit from different optics.
Below are real-world examples you can apply immediately:
- Kitchen general lighting: medium (30°–40°) is a reliable baseline. Add narrow accents only where you want emphasis.
- Artwork and features: narrow (10°–20°) placed with intent. Fewer fixtures, better focus.
- Low ceilings and corridors: wide (40°–60°) for smoother coverage and fewer harsh circles.
Spacing, scallops, and glare control
Beam angle also affects how light “prints” onto walls and ceilings. When downlights sit too close to a wall, you will see scallops. If they are too bright or too open, you can get glare and uncomfortable brightness at eye level.
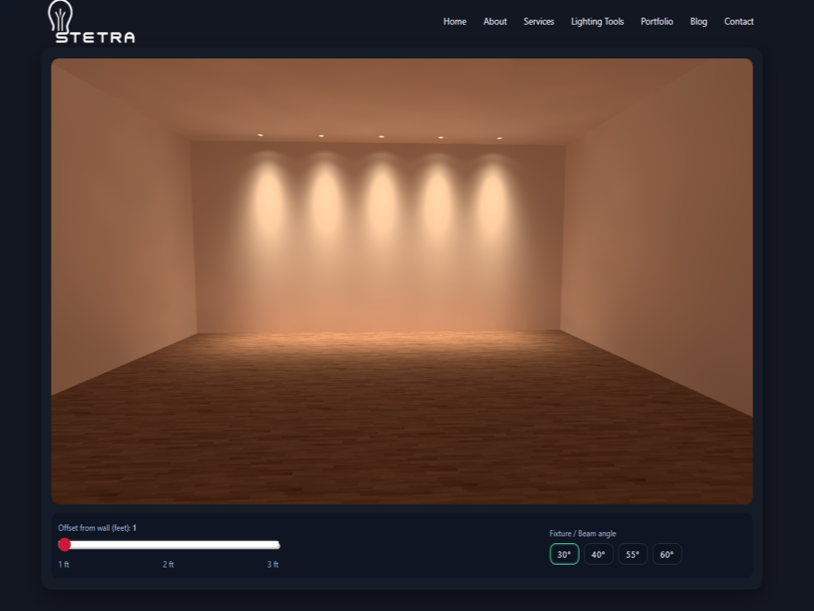
To predict wall scallops before installation, use our visual tool here: Lighting Scallops Visualizations. In addition, it helps you test distance-from-wall and spacing so the pattern looks intentional.
- For smoother walls: choose medium/wide beams and increase distance from the wall.
- For textured walls: tighter beams can work, but keep brightness controlled to avoid glare.
- For comfort: use fixtures with good cutoff and consider glare control options (baffles, deeper regress, shielding).
When the project matters, the clean way to verify beam angle choices is a photometric check using the fixture’s IES file. This shows actual foot-candle levels, uniformity, and where glare risks appear.
Real Examples: What Beam Angle to Use
Use these examples as a starting point. They reflect typical design intent. Final selection should still be confirmed with the actual fixture optics and the IES distribution. Use this downlight beam angle guide as a reference when reviewing fixture cut sheets and IES files.
30° vs 60° Downlight Beam Angle: Which One to Choose
A 30° beam concentrates light into a tighter area. As a result, it creates higher contrast and stronger highlights. It works well for accents, art, and focused task zones, but it can look spotty if used everywhere.
A 60° beam spreads light wider for smoother coverage. In most cases, it reduces hot spots and allows wider spacing. It often works better for lower ceilings and general ambient lighting.
Simple rule: use 30° when you want focus and contrast. Use 60° when you want even coverage and comfort. If you are unsure, start with a wider beam for the base layer, then add tighter beams only where you need emphasis.
- Living room (general lighting): 30°–50° depending on ceiling height and fixture output. Medium beams keep the space balanced without looking spotty.
- Kitchen (task + ambient): 30°–40° over open floor areas, plus targeted narrow beams for art or display shelves. Over counters, placement and shielding matter as much as angle.
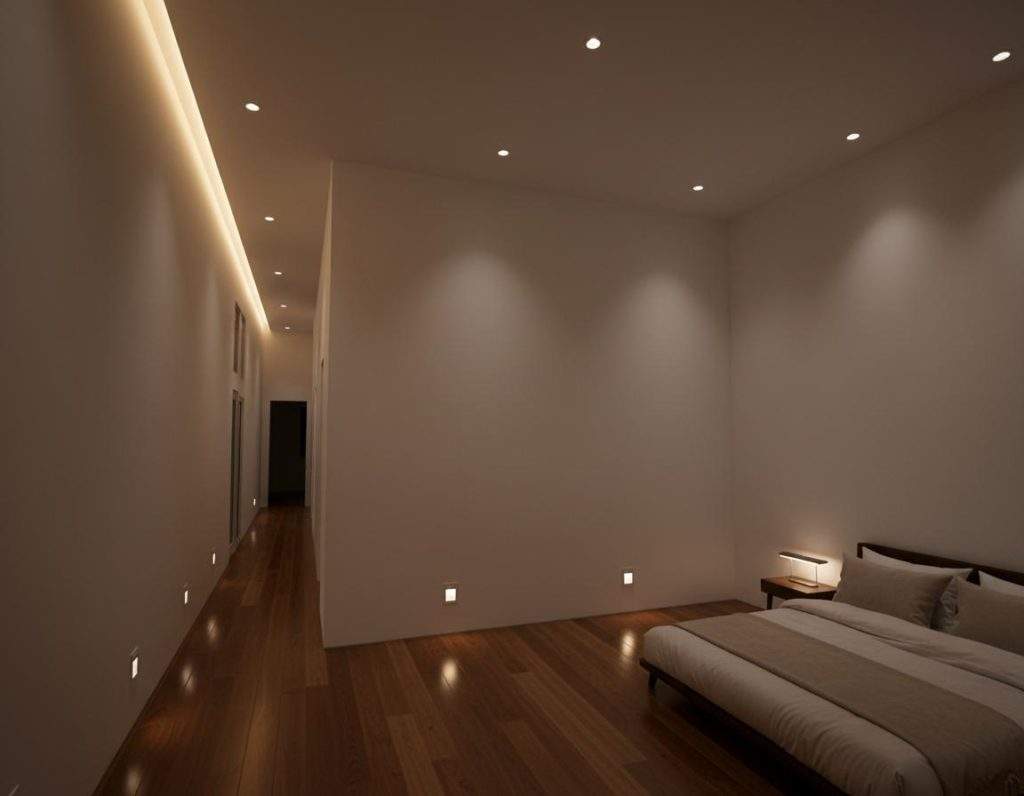
- Hallway: 40°–60° to smooth the line of light and reduce harsh circles. Medium can work too if spacing is tight.
- Shower and bathroom: medium beams for overall coverage, with careful placement to avoid glare in mirrors.
- Art wall or feature niche: 10°–20° for focus. Add fewer fixtures and aim them properly. Do not wash the whole wall with narrow beams unless you want strong contrast.
In many cases, if your layout looks “busy,” it is often a beam choice issue, not a fixture quality issue. Too many narrow beams create many bright circles. Too many wide beams can flatten the room and reduce visual hierarchy.
- Fast fix: use medium beams for most downlights and reserve narrow beams for accents only.
- Glare fix: choose better cutoff optics and avoid placing bright downlights where people look up (seating, beds, mirrors).
- Scallop fix: adjust distance-from-wall and test the pattern before locking the layout.
Common Beam Angle Mistakes to Avoid
What is a downlight beam angle?
A downlight beam angle is the spread of the main light cone leaving the fixture. Narrow angles concentrate light into a smaller area, while wide angles distribute light across a larger area.
What’s the difference between 30° and 60° downlight beam angles?
A 30° beam creates a tighter, brighter spot with higher contrast. A 60° beam spreads light wider for smoother coverage, which often reduces hot spots and allows wider spacing.
Is 30° or 60° better for general lighting?
In most rooms, 60° (or 40°–60°) works better as a general lighting base layer because it looks more even. Use 30° for accents, feature areas, and targeted task zones.
How does beam angle affect spacing between downlights?
Wider beams usually allow larger spacing because the light overlaps more. Narrow beams need tighter spacing to avoid dark gaps and visible circles on the floor.
Does a wider beam reduce glare?
Sometimes, but not always. Glare depends on cutoff, shielding, and brightness at typical viewing angles. However, very tight beams can create stronger contrast and more noticeable hot spots if placement is not controlled.
Why do I see scallops on the wall from my downlights?
Scallops appear when downlights are placed too close to a wall or spaced in a way that creates a repeating pattern. Beam angle and distance-from-wall both change the scallop shape and intensity.
Get a Professional Photometric Plan
Key Takeaways
- Narrow beams (10°–20°) are best for accents, not full-room lighting.
- Medium beams (24°–36°) are the most reliable choice for clean general lighting.
- Wide beams (40°–60°) smooth coverage and can reduce hot spots, especially in lower ceilings.
- Always check glare and wall scallops before finalizing placement.
- When the result matters, confirm choices with the fixture IES file and a photometric plan.
If you want a layout that installs clean and hits real light level targets, Stetra Lighting can model your fixtures and verify beam angles with photometric calculations. Use the scallops tool to test wall patterns, and reach out when you need a full plan that is ready for construction.